
Triggering is the main active element of firing a shot. How you place your hand on the pistol grip is key to keeping this simple task a simple task.
A good trigger release is the third part of the important trio of hold, aiming and triggering. A good trigger release is something that is in your control, but not something that will happen naturally. There are several things you can adjust or change to help you be more consistent. Modern rifle stocks allow for a wide range of adjustments which means you should be able to adjust your rifle for a good fit where it matters.
Things the affect your trigger release.
There are several things to do with set-up that can affect your trigger release as well as the way you pull the trigger itself. The most obvious of these is how and where you place your finger on the trigger. Less obvious (to rifle shooters) is how you position your hand on the pistol grip. Both will have an impact on your triggering but pulling the trigger itself will also have an impact.
Trigger finger placement
The simple rule to follow for placing your finger on the trigger is that at the point of triggering you should be pulling the trigger straight backwards. Any sideways force you apply to the trigger will move the rifle away from where you have aimed it. This is less of a problem with a rifle than it is with a pistol as you have 2 hands on a rifle and it is a lot heavier, but it will still have an effect on triggering.
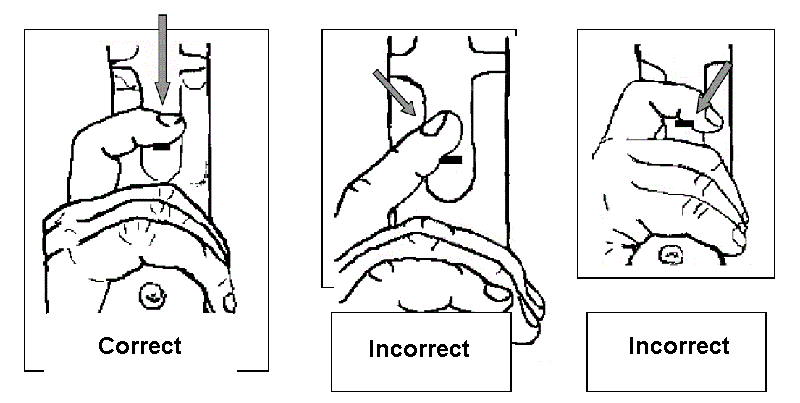
The ideal place for your finger is at the centre of the pad on you last digit. This is the place where the whorl on your fingerprint is. For the external observer, coaches take note, this is about in line with the start of the fingernail.
Trigger hand placement
You have five fingers (even though we call one of them a thumb); the thumb has 2 joints while the fingers have 3. It is quite a complex mechanism that is capable of some amazing things. We are not after complex when we grip the rifle, we need to make it as simple as possible, so it works well under pressure.
The index finger is the part that is going to pull the trigger so that needs to be free to move. Your middle 2 fingers are long enough to wrap around the grip and are going to do the work of maintaining pressure on the grip. The little finger is not your friend, it’s too short to help apply pressure backwards but it is good at applying sideways pressure. Your thumb wraps around the other side of the grip and is also a source of sideways pressure.
So that you only impart force along the line of the barrel the pressure you exert on the grip comes from the middle 2 digits of your trigger hand. You balance the backwards pressure against the metacarpals (the first bones from your wrist to your finger bones) of the thumb and index finger. Your fingertips should only make light contact as each of them will apply a sideways force if you add too much pressure.
The other thing to think about when you place your hand is your wrist position. The ideal is to keep your wrist straight, but this is not something that is easy to achieve. The important factor is to keep your wrist relaxed and as straight as possible.
Getting the right fit for triggering
Modern rifles tend to have adjustments for everything. You will be able to move the trigger backwards and forwards on a rail; you may even be able to move it between two different rails to give you lateral movement. On the trigger unit, the blade can usually move up or down as well as rotate around the trigger post. You may even find you can rotate the trigger unit on its rail.
You can usually move the grip backwards and forwards. In some instances, it can move side to side or rotated through just about every angle. The grip can also be resized too. The simple thing is to buy the best size grip with your rifle or buy a new one that better suits your hand size. No matter how pretty your grip looks, anything that you are not actually gripping is of no use to you and could cause you problems in other areas. It might feel drastic but removing unused bits of your grip may actually help you in the long run.
Getting the right set-up will probably involve moving both the grip and the trigger as well as adjusting the stock length too.
How much pressure do I need to apply to the grip?
This is something that will be personal to you. Too little pressure will result in the rifle moving when your trigger finger moves or when the rifle recoils. Too much pressure will result in a less stable hold. You need a firm grip, but not too firm.
The other thing to be aware of is change in pressure in your trigger hand as you fire the shot. This could be a reaction to the expected recoil or applying pressure with more than just your trigger finger when you fire. Either way, it will probably move your point of hold during the trigger phase and affect the point of impact.
Make sure everything fits properly to help with triggering
Start off by examining your rifle to find out what you can adjust with the trigger assembly and grip. As you adjust your rifle you will find that one tweak will likely lead to another. You will probably end up moving things many times until you get a good fit.
I’m not sure of the best order of doing things, but here is one suggestion starting with placing your hand on the pistol grip.
Holding the pistol grip
Before you do anything else, take time to place your hand correctly. Think like a pistol shooter; place the grip in the V between fingers and thumb and locate the back of the pistol grip within the V. Wrap your fingers round and see where they end up.
If your fingers go too far around then your pistol grip is too small; if the middle 2 digits of your middle fingers don’t get round the front at all then your grip is too big. Should your pistol grip be quite a long way out, you should look at getting a new grip. You can make small adjustments with a file and sandpaper when making your grip smaller, but don’t go mad. Remove a bit and test.
- Close your eyes and think about the pressure on the grip. Feel the pressure through the 2 middle digits of your middle fingers and check the pressure imparted by your fingertips. There should be minimal pressure from your fingertips and your thumb.
- Remove and replace you hand many times, each time thinking about the pressures you feel. Keep doing this until you can place your hand by feel alone the same way every time.
Getting the trigger in the right place
With your hand working as it should now turn your attention to the trigger. Adjustment the trigger assembly so that your index fingertip is at right angles to the line of the barrel when you have taken up the first stage of your trigger (or have applied nearly all of the pressure in a single stage trigger).
Try not to turn the trigger blade around its vertical axis and make sure you can feel both sides of the trigger blade.
You may need to move the grip forwards or backwards as well as moving the trigger assembly to get the fit you need.
Adjust the height of the trigger blade so you can find the reference point on your trigger blade while keeping your trigger finger horizontal.
- Place your hand on the grip getting the contact right and the pressure correct in your fingers.
- Place your trigger finger on the trigger blade and feel the correct contact.
- Repeat until you can do it the same every time.
Adjust the length of the stock
As a starting point for adjustment the pistol grip should be in line with the front shoulder joint. There should be enough pressure between butt plate and back shoulder to hold the rifle firmly, but not too much pressure to prevent you relaxing your trigger arm. Extending the butt plate will increase the pressure. Try and find the point where you have reasonable pressure, but you don’t add any tension into your arm. This should result in the elbow of you trigger arm being slightly forward of vertical.
- Start with your stock a little short, place your hand correctly and make a note of the butt plate pressure in your shoulder and any tension in your trigger arm.
- Lengthen the stock by about 3mm and repeat the process.
- Keep lengthening the stock until you start to feel tension building up in your trigger arm and shoulder. This is the sign you have gone too far.
- Shorten the stock again in 1mm increments until you feel the tension go back to previous levels.
Remember you are looking for a stock length that gives you a straight wrist, an elbow position slightly forward, a comfortable amount of pressure in your shoulder and minimal tension in your trigger arm and shoulder.
Dry firing with triggering, rifle supported
With a basic fit achieved its time to test it out. Start off in a sitting position with the rifle supported. Support the fore-end with a kneeling roll or a rifle rest so you don’t grip the rifle with your supporting hand. Adjust you position and possibly the height of the aiming mark so that your natural point of aim coincides with the centre of the target.
- Place your hand on the grip getting the contact right and the pressure correct in your fingers.
- Place your trigger finger on the trigger blade and feel the correct contact.
- Operate the trigger paying close attention to the pressures in your hand. Make sure there is no change in pressure as you move the trigger through its full range.
When you feel comfortable that the pressures are remaining constant set your rifle to dry fire.
- Repeat the process above without looking through your sights. Just focus on feeling for any change in pressure in your hand. Maintain the pressure on the trigger after the shot fires.
- Repeat again, but this time looking through your sights. Instead of feeling for pressure changes, watch for any movement of the front sight on trigger release.
- Repeat both exercises many times.
Don’t be afraid to tweak your set-up if you don’t feel everything is right. You will probably not get the optimal set-up first time. If you shorten the stock you may need to move the pistol grip and the trigger assembly forwards to compensate.
Shooting in position focus on pressure, tensions and triggering
Alternate between these different exercises in your normal standing position
- Dry fire with your eyes closed with focus on the pressure in your trigger hand and the tensions in your trigger arm.
- Dry fire using your sights watching for movement in your front sight on triggering.
- Live fire as normal but with some focus on the pressures in your hand.