Rifle aiming looks like a simple task, but it is so easy to get it wrong without knowing why. Understanding the principles of the sighting system will help you to correct some of the most basic of errors.
How do my dioptre sights help in aiming my rifle?
If you ask people how many parts are in their sighting system, the normal answer is 3. The rear sight, the front sight and the aiming mark. People usually forget the most important part of the equation, their eye!

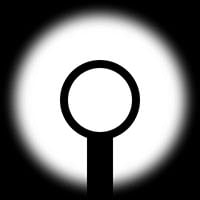
In reality, your dioptre sights have 2 sighting systems built in. The obvious one is the relationship between your eye, the front sight element and the aiming mark. This is the primary aiming system and the one you focus on before pulling the trigger. Often ignored, the second system is the biggest cause of aiming errors. It is the relationship between your eye, the rear sight iris and the front sight tunnel. It’s important because it confirms you are looking through the centre of your rear sight.

Why is this important?
We get very good at spotting the aiming mark in the centre of the front sight element. It moves about a bit, and we don’t always get it right, but the margin of error is quite small. For someone with a reasonable hold the margin of error might be up to 2mm on the target. That is still going to get you deep 10’s. When you don’t look through the centre of the rear sight, the same person could see their margin of error rise to over 8mm. That is out of the 10 ring altogether.
Ever seen what looks like a perfectly executed shot land in the 9-ring? A big contributing factor could well be not looking through the centre of your rear sight.
How can I make sure I am looking through the centre of my rear sight?
There are 2 things you can do to make sure you are looking through the centre of your rear sight. The first is obvious; you actually check your sights. The second is to do with rifle set-up, you make it easier to get it right first time.
Checking your sights
This should be the first check you do when you look through your sights. It is easier to check if you don’t have the aiming mark in view. Your brain is good at centring the aiming mark, which could pull your focus away from what you are checking.
- Lower your head onto the cheek piece with your eyes averted from the sights.
- Check your head position based on what it feels like.
- Make sure the rifle is pointing to a space above the aiming mark. A full breath in should be enough for that.
- Check the space around the front sight tunnel, left, right and above. The space should look the same.
- Continue if it does. If it doesn’t then lift and replace your head and try again. You may feel like you can just slide your head over, don’t, as this could lead to other errors.
- If it doesn’t want to line up, you may need to make an adjustment.
Adjusting your rifle for more consistent aiming
The cheek piece on the rifle is there to help you get your head in the same place every time. On target rifles the cheek piece will move up and down and from left to right.
- Without looking through your sights place your head on the cheek piece where it feels comfortable and in a way that doesn’t add any tension through your neck.
- Repeat that a few times so you can get the feeling and make it repeatable.
- When you are comfortable with where your head is going, look towards the sights.
- If your head position is close you will be able to see through your sights. In many cases you may not be able to see through the dioptre.
- Judge where your eye is looking, high/low and left/right.
- Make a course adjustment so that you can see through the rear sight aperture.
- When you can see through the aperture you can make fine adjustments to make sure you are looking though the centre of the sights.
There shouldn’t be a problem with most rifles adjusting in the vertical plane. However, if you have a lot of risers on the sights, you may run out of upwards adjustment. Left and right adjustment is not always as easy.
Many standard cheek pieces do not have enough horizontal adjustment to get your eye behind the rifle centreline. If this is the case, you have a few options to solve the problem.
Changes to help rifle aiming when you can’t adjust the cheekpiece enough
The first is to change or modify the cheek piece to allow it to move further over. It is not unusual to see a home made cheekpiece attached to a rifle even in high level competition.
The second option is to offset the sights on your rifle. You can buy riser blocks that have removeable pillars that you attach in one of 3 positions, centre, left and right. If you use this type of adjustment you need to remember to make the same changes on both the front and rear sights. You may run into other problems if your sights are away from the centreline, so it is not necessarily your first choice for solving the problem.
The other option is to cant the rifle towards you. Turning the rifle like this will bring the sights towards your eye. This is another option which can lead to more problems in other areas.
Be aware, just because you have adjusted your cheekpiece once it will not always be right every time. Big sight adjustments will move the centre of the aperture. If you have made big sight adjustments, be prepared to adjust your cheekpiece so you are still looking through the middle of your sights.
Some days you may be carrying a little more water than others. This will change the profile of your face by small amounts and could mean you are not looking through the sight centre. You can check this before a training session, or in the dry firing area before a match. Take the time and get it right.

Rifle Aiming Training Session
Place a blank target down the range or set up against a blank wall.
- Go through your normal process, placing your head on the cheekpiece with your eyes averted from the sights.
- Check the front sight tunnel vigorously. Is the front sight tunnel as central as it could be?
- Repeat 10 times. Do you get the same outcome every time?
- Focus on the feeling of contact you get and make sure it feels the same every time. Reinforce the feeling by confirming your accuracy with the sights.
- If you are consistent but not central, optimise your cheekpiece.
- Keep repeating the exercise until you can place your head every time with a high degree of accuracy.
Move to the range or put up a target with an aiming mark.
- Repeat the exercise for 10 repetitions, confirming your head position with the sights.
- Fire 20 shots, confirming your head position before you move to full sighting and firing the shot.
- Do you see and improved grouping on the target?

